Configuring device option sets
Option management allows an admin to configure device settings that include system updates, location mode, screen message and timeout, time zone settings, proxy setup, wallpaper and more. Option sets are created in the library and can be applied to single or multiple devices.
The Option Sets library includes workflows for Android, macOS, tvOS, supervised iOS, and Windows devices.
In the option sets library, an admin can add a new Android, Apple, or Windows option set as well as edit or remove an existing option set.
|
|
NOTE: Certain types of option sets do not take effect when applied to Android COPE devices. |
Option Sets Library:
.png)
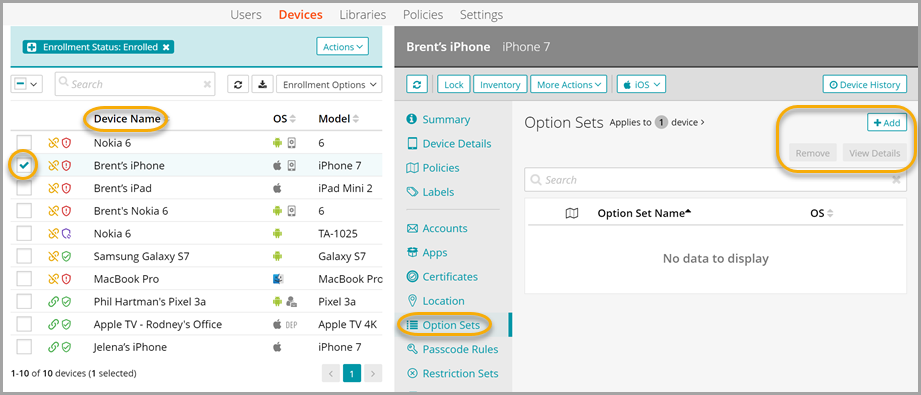
In the option sets devices section, an admin can choose single or multiple devices, then under the option sets tab in the right panel can: add a new option set; view all option sets currently applied to the device(s); remove an option set; or view details for an option set.
Option Sets Devices section:
Add new option set to Library
An option set is a grouping of multiple options that are created, named, and saved as a single set, and then applied to devices. Option sets are created and managed in the option sets library.
|
|
NOTE: When adding a wallpaper for a home or lock screen, always consider the size and aspect ratio of your device. The image file must be in PNG or JPG format. For example, the average screen size of a mobile phone is 4.7 inches to 6.5 inches, with the aspect ratio of 16:9. The recommended image size for a phone is 640 pixels wide and 960 pixels tall. Smaller images typically load faster, but they may not look sharp on phones with higher resolutions. Similarly, larger wallpapers will look sharp, but they will take more time to load. |
Android
- Select the Libraries tab in top navigation.
- Choose Option Sets.
- Click + Add New, then choose Android.
- Name and describe the option set, then configure the available options.
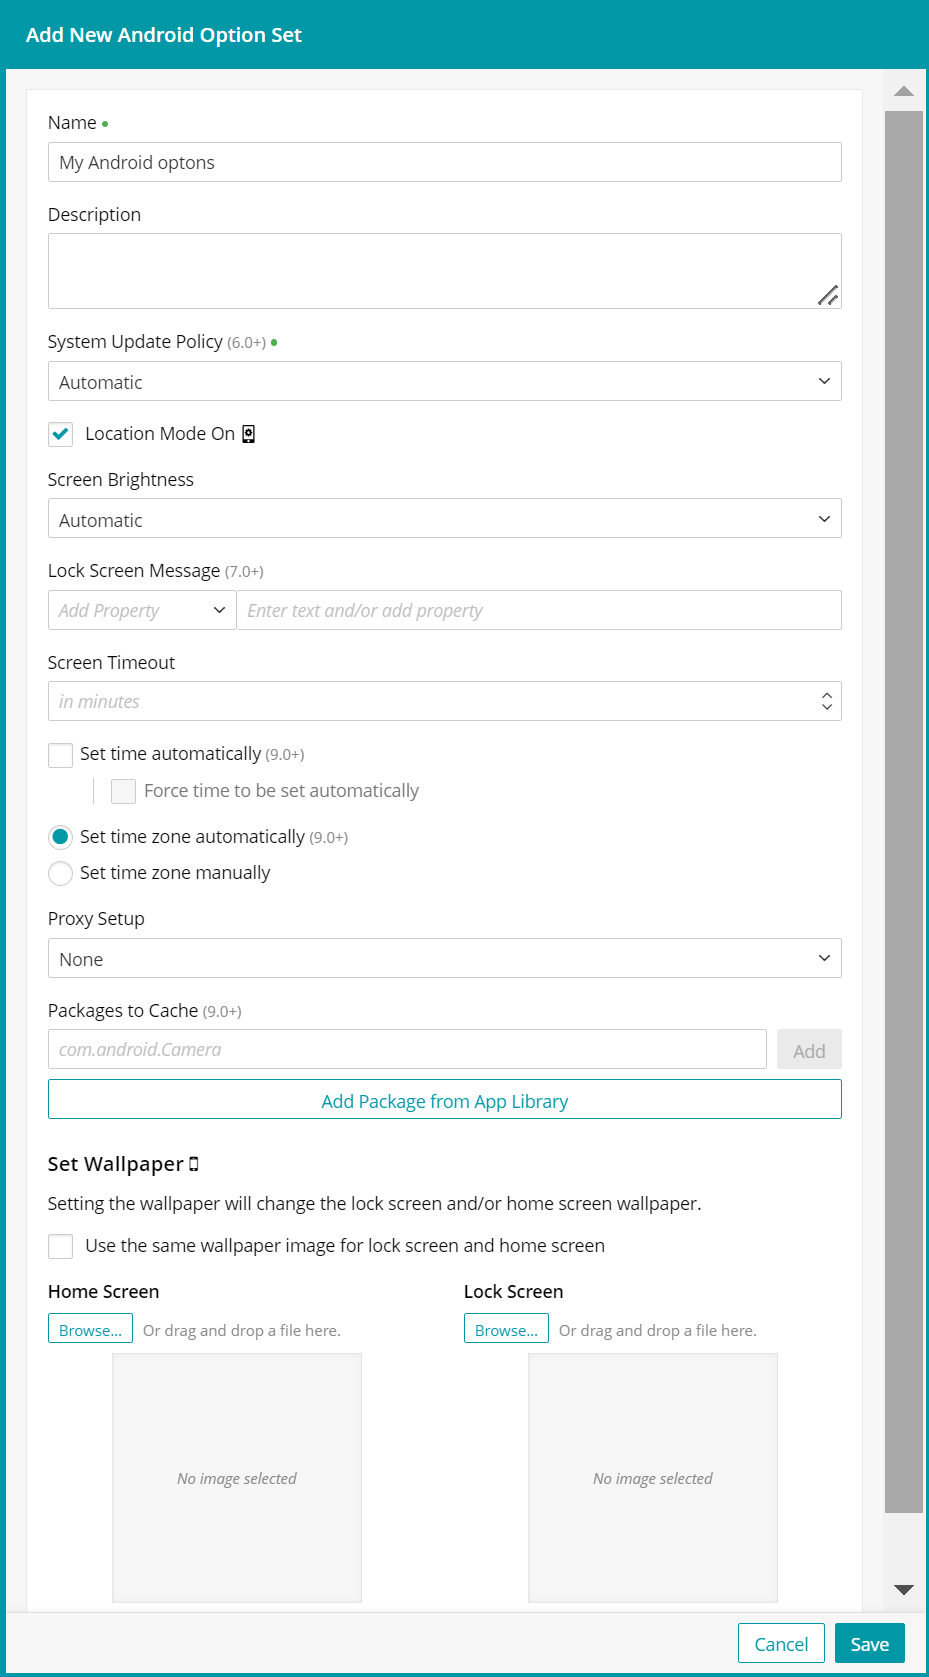

NOTE: Disabling the Location Mode overrides any Location Rule sets associated with the same device. For more information about Location Rules, see Add new rule set.
- Lock Screen Message only. You specify the device in the lock screen message by selecting one or more device properties.
Under Device Name Pattern, click Add Property and in the list that appears, select a desired element.
The list is divided into several categories: Device Properties, User Properties, and LDAP Attributes. When you select a property, the field on the right displays the variable associated with the selected property. For example, if you choose Device Properties > Serial Number from the drop-down list, the field on the right displays %device.SerialNumber%. You can select multiple properties, one after another, and use text delimiters to form a desired naming pattern. Each time you select a property from the list, the related variable is appended to the naming pattern on the right.
For example, to use the model number, serial number, and the user name as the device naming pattern, make these selections in the drop-down list in the following order:
- Device Properties > Serial Number
- Device Properties > Model Name
- User Properties > User Full Name
When the field on the right is populated with the related variables, you can add desired symbols to separate them such as a hyphen '-'. For example: %device.SerialNumber%-%device.ModelName%-%user.fullname%.
- When you're done, click Save.
The options shown in the above view are available for fully managed Android and COPE Android devices.
Apple
- Select the Libraries tab in top navigation.
- Click the Option Sets icon.
- Click + Add New, then choose Apple.
- Name and describe the option set, then configure the available options.
.png)
- Specify the device name. You can name the device by selecting one or more device properties.
Under Device Name Pattern, click Add Property and in the list that appears, select a desired element.
The list is divided into several categories: Device Properties, User Properties, and LDAP Attributes. When you select a property, the field on the right displays the variable associated with the selected property. For example, if you choose Device Properties > Serial Number from the drop-down list, the field on the right displays %device.SerialNumber%. You can select multiple properties, one after another, and use text delimiters to form a desired naming pattern. Each time you select a property from the list, the related variable is appended to the naming pattern on the right.
For example, to use the model number, serial number, and the user name as the device naming pattern, make these selections in the drop-down list in the following order:
- Device Properties > Serial Number
- Device Properties > Model Name
- User Properties > User Full Name
When the field on the right is populated with the related variables, you can add desired symbols to separate them such as a hyphen '-'. For example: %device.SerialNumber%-%device.ModelName%-%user.fullname%.
- Configure the remaining options, as required.
- When you're done, click Save.
The options shown in the above view are available for macOS, tvOS, and for supervised iOS devices.
Windows
|
|
NOTE: While it is possible to create and apply multiple option sets to a managed device, applying the same setting multiple times is not recommended. When doing so, the most recently applied option set always takes precedence. Subsequent removal of the latest option set does not restore any of the removed settings included in a previously applied option set. |
- Select the Libraries tab in top navigation.
- Click the Option Sets icon.
- Click + Add New, then choose Windows.
- Name and describe the option set, then configure the available options.

- When you're done, click Save.
Add new option set to devices
|
|
NOTE: Certain types of option sets do not take effect when after applied to Android COPE devices. |
- Select the Devices tab in top navigation.
- Select one or more devices from the main list.
- In the right panel, choose Option Sets.
- Click + Add.
- Select an existing option set from the list.
- Click Apply to Device.
Add new option set to devices using policies
- Select the Policies tab in top navigation.
- Complete one of the following steps:
- To create a policy, click Add New.
- To edit an existing policy, click the policy to open the policy details.
- In the Applies To section, select one or more labels associated with target devices. For more details about labels, see Using labels to group similar items.
- In the right pane, in the Resources tab, click Add Resources to open the drop-down list, and then click Option Sets to open a dialog.
- Slide the Link toggle to link/unlink the Option Sets.
- To link the Option Sets to policy, slide the Link toggle to right. The color of the toggle changes to green indicating the resource is linked.
- To unlink a previously linked Option Sets, slide the Link toggle to left. The color of the toggle changes to red indicating the resource is unlinked.
- (Optional) In the Options column, click the icon to open Resource Options dialog. Select one of the following Compliance Type:
- Include - Select this option to include the resource when determining the compliance status.

NOTE: By default, all the Resources in a policy are included in compliance checks.
- Exclude - Select this option to exclude the Resource when determining the compliance status.
- Include - Select this option to include the resource when determining the compliance status.
- Click Add Resources to associate the item to the policy. You can view the resource in the Resources pane.
- Click Push Resource to deploy the added Option Sets to the target devices or users.
For more information about policies, see Using policies to manage device configurations.
View option set details
- Select the Devices tab in top navigation.
- Select a device from the main list.
- In the right panel, choose Option Sets.
- Click the View Details button.
Edit option sets
An option set can only be edited in the library—it cannot be edited from the individual devices section.
- Select the Libraries tab in top navigation.
- Click the Option Sets icon.
- Select the option set that you'd like to edit.
- In the right panel, click Edit.
- Make changes, then click Save.
Remove option sets from Library
Removing an Android Option Set from the Library does not remove any associated values from target devices, it just prevents KACE Cloud from managing them collectively through Library Option Sets.
- Select the Libraries tab in top navigation.
- Click the Option Sets icon.
- Select one or more option set from the main list.
- Click Remove, then Confirm.
Remove option sets from devices
Dissociating an Android Option Set from a managed device, or removing an associated Android Option set from the Library does not remove any associated values from target devices, it just prevents KACE Cloud from managing them collectively through Library Option Sets.
- Select the Devices tab in top navigation.
- Select one or more devices from the main list.
- In the right panel, choose Option Sets.
- Select the option set that you'd like to remove.
- Click Remove, then Confirm.